
This document will cover off on all aspects of using IWOS to record and sell entry into Inflatable World.
Start Up
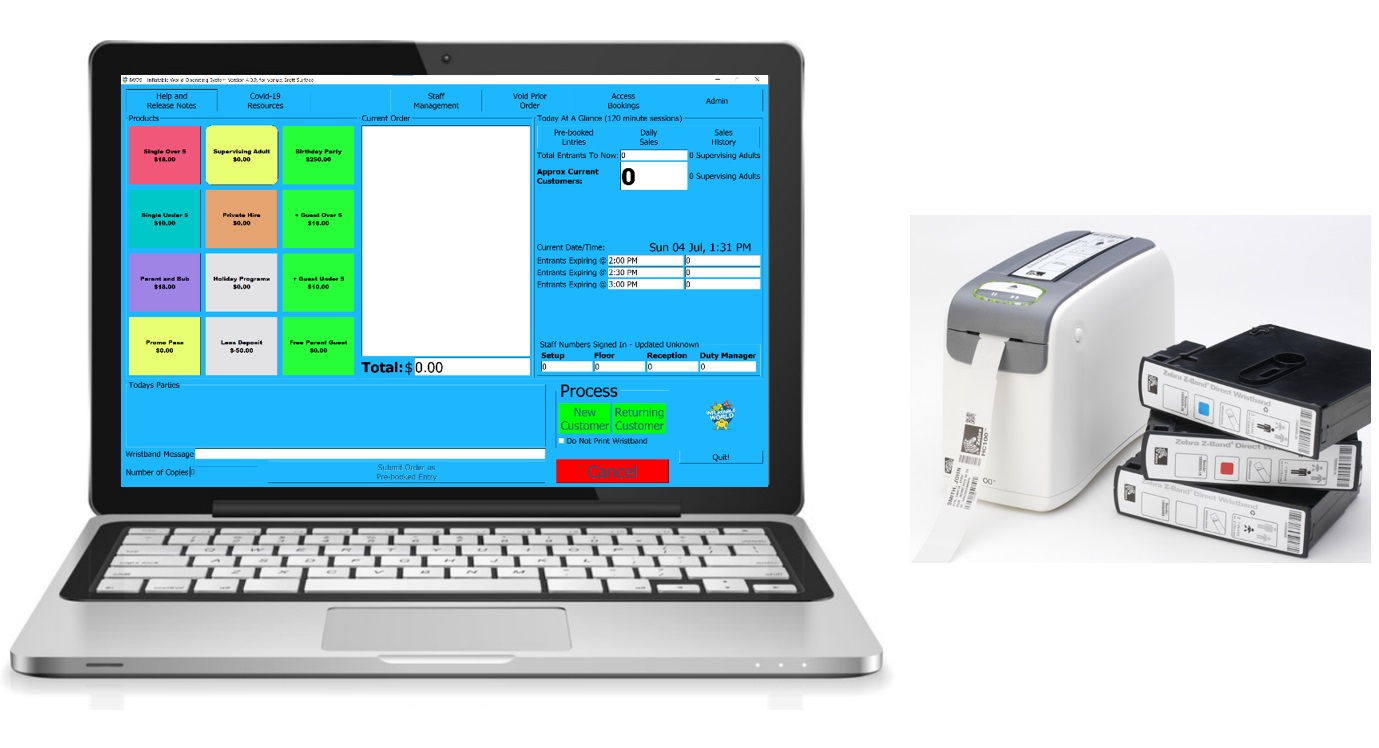
All sales for Inflatable World need to be recorded through the IWOS sales system.
Each venue wil have its own log in for their stadium to record and track sales.
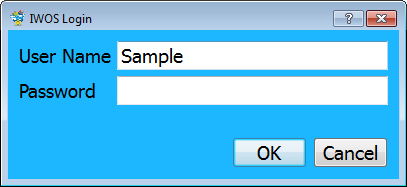
You will need to open the IWOS software and log onto your site information. Double click on the IWOS icon on your desktop.
The following screen will now appear asking you to log in.
Enter your username and password here and sign in. Note: Passwords can be changed in the Admin Menu once you have logged in.
On the FIRST login of any day you will be required to complete the OPENING COMPLIANCE CHECKS. These are to ensure that Safety requirements and checklists required in your Inflatable World License have been addressed.
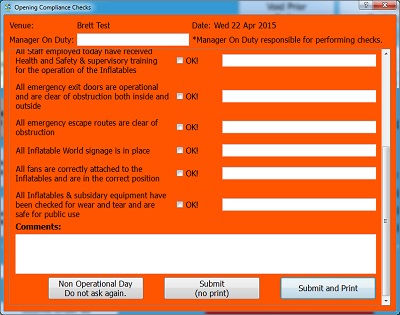
These OPENING COMPLIANCE CHECKS are archived electronically. If you are opening IWOS on a day that Inflatable World is not operating (ie to check some figures or prepare pre-booked entries such as Birthday Parties) you can skip this step by noting the Non Operational Day button.
Note: Doing this on an operational day will be highlighted in the archives and is a breach of the Licensing Terms.
Home Screen
Once the Opening Compliance has been completed you will be directed to the Main Screen that will look similar to this:
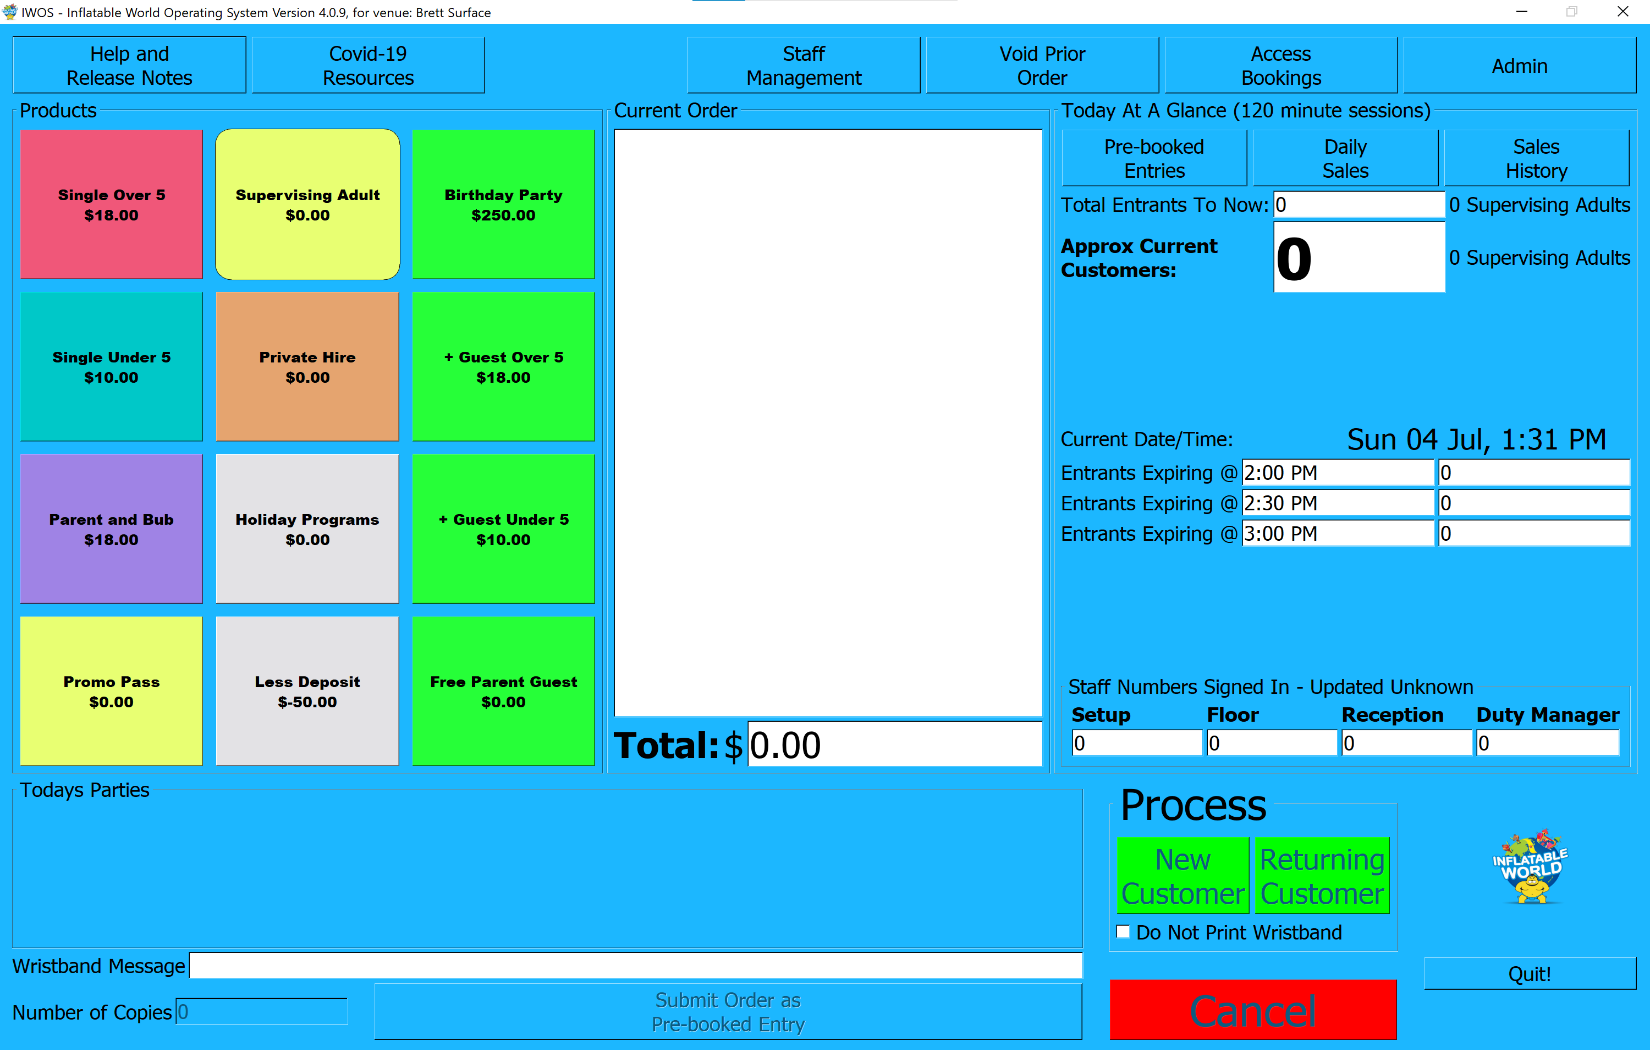
The Main Screen shows all relevant information for you to do the following:
- Create Sales
- Monitor Patron occupancy levels –
- Current Customers
- Expiring Wristbands
- Monitor Staffing Levels
- Shortcut to –
- Daily & Historic Sales
- Birthday Booking System
- Pre-Booked entries
- Staff management
General Entry
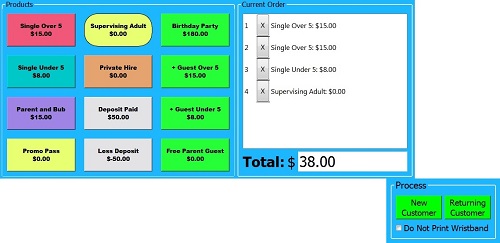
Let’s start with General entry admission.

- Single Over 5 includes children 5 years of age and up, including Adults.
- Single Under 5 includes children up to 5 years of age.
- Parent and Bub is used when you have a child under 5 years of age and an adult entering with them to supervise – the parent enters for about half price.
- Promo Pass is loaded onto the system and used for anyone redeeming a FREE VISIT PASS.

- Supervising Adults are FREE, there is no charge if they are not using the equipment and therefore they will not require a wristband; wristbands are only used for those using the equipment. We use the Supervising Adult button to keep track of occupancy levels – No Wristband will be printed.
Once you have clicked on the product buttons, the total owing for any entry will be calculated.
To remove a product from the sale, click the “X” next to the product in the current order:![]()
To finalise the sale click one of the Process buttons.
You will be able to view reports showing the number of New and Returning customers. The printer will automatically PRINT the required amount of wristbands for the order.
Tracking Occupancy Levels
To ensure a safe and enjoyable environment at each facility we have built into the IWOS system the ability to see at a glance the occupancy levels of your facility. Each time an entry transaction takes place the number of people entering is automatically updated, as well as the expiry time of their wristband (see wristbands expiry procedures).
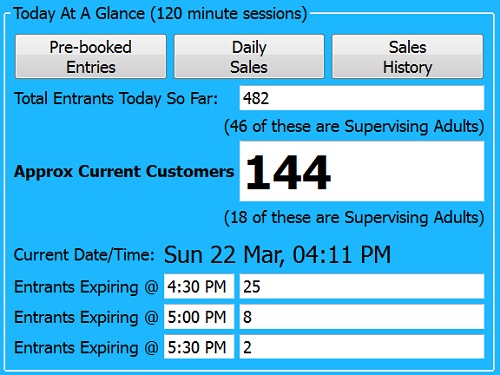
Note: that you can see the current customers as well as those expiring each 30 minutes for the next three(3) timeslots. This allows you to control traffic flow of incoming customers with the knowledge of how many customers will be leaving.
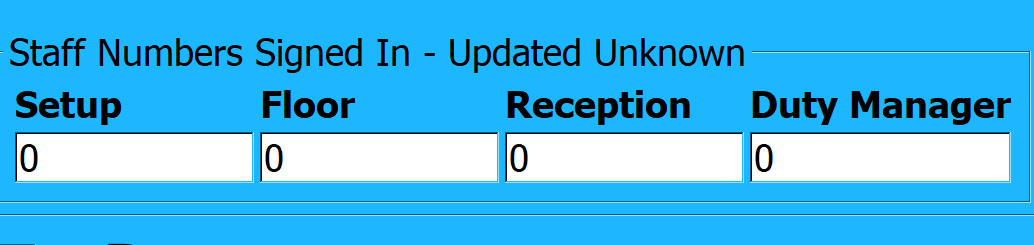
Tracking Staff Levels & Staff Sign Ins
Managers can note Staffing Levels at a glance from the Staff Signed in on the IWOS Tablet.
It is a requirement for ALL STAFF to sign into the IWOS Console Tablet prior to the start of their shift to ensure they receive all relevant Training Documents and Alerts. (Refer: IWOS Console User Guide).
The Staff SIGNED IN on the IWOS Tablet are updated every 15 Minutes to the Main Screen section below.
Birthday Parties
All Birthday Party bookings are put through the online booking system. Refer Procedure Birthday Party Bookings for more information on this.
All Birthday Parties also need to be put through IWOS. There are a couple of steps involved so we have made a wizard to simplify it for you. It is recommended that you enter your parties during the week so all your wristbands are pre-printed. The following steps will show you how.
- Add a Birthday Party item to your Order:

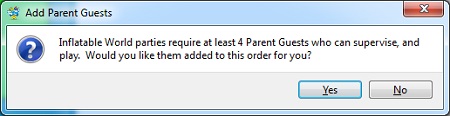
- You will be prompted that parties require Parent Guests to supervise. These extra guests require wristbands as they can play, and can automatically be added to your order by answering Yes:
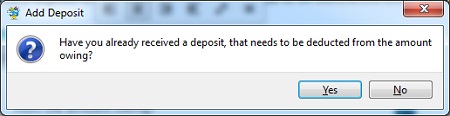
- Except under rare circumstances you would have previously received a deposit from the customer, which needs to be subtracted from the order total. You can add a Less Deposit item by answering Yes to the next question:
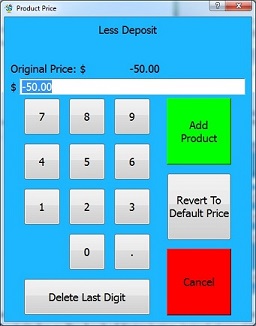
- You can change the amount of the deposit already received. The default for your venue will appear but in the event you have received a different deposit, you are given an opportunity to change the amount. Pree Add Product when the total is correct:
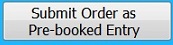
- To enter the order as a Pre-Booked Entry (ie the order is for a different time than now), which allows you to print additional wrist bands easily as extra guests arrive, and track the whole party, press the Submit Order as Pre-booked Entry button, instead of one of the Process buttons. The IWOS system will hold the entry in a suspense account and process the $ value and adjust the occupancy for this entry at the time of your choosing.
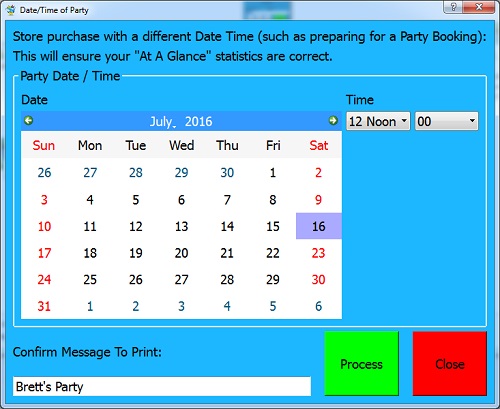
- In the screen that appears, select the day and time of the party, and enter the message you would like to have appear on the wristband. When you are happy, press Process:
Managing Pre-Booked Entries
Once a party has been submitted as a Pre-Booked Entry, you may need to make edits to it, such as changing the date/time, pre-printing some extra wristbands, or cancelling it altogether. You can manage entries from the Pre-booked Entries button in the Today At A Glance section. 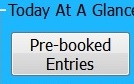 . You will be presented with an interface for managing entries. This lists all parties for the day, or optionally, all parties for today and ahead.
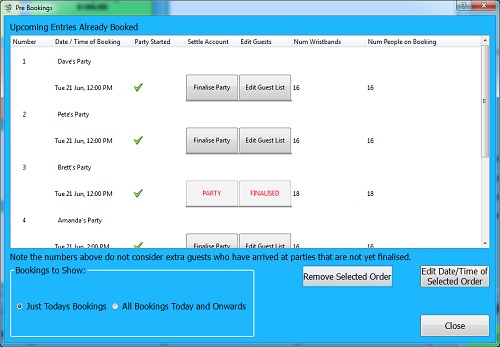
![]() Allows you to REMOVE a Pre-Booked Entry, in case the party is cancelled. Select the entry you want to remove, and then press this button.
Allows you to REMOVE a Pre-Booked Entry, in case the party is cancelled. Select the entry you want to remove, and then press this button.
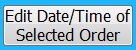 Allows you to EDIT the Date/Time of a Pre-Booked Entry, if you entered the wrong details, or the party gets rescheduled. Select the entry you want to edit, and then press this button.
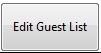 Opens the following screen for adding additional guests to the party (and printing a wristband for them).
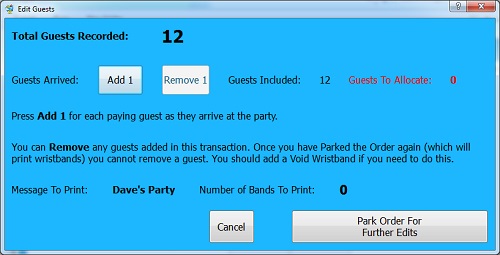
It will NOT allocate a value for the wristband sale (yet), so there is no need for a distinction between under 5, or 5 and over. When you are finished, press Park Order For Further Edits, to keep the changes.
 Opens the following screen for finalising the party.
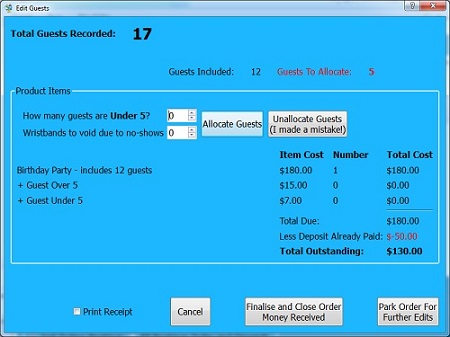
Here you can see the total number of guests (wristbands) for the party. It includes the initial Birthday Party booking (usually 12 guests), and any added guests. In the example above, there are 5 guests to allocate. There will be cases of No-shows – where you pre-print, for example, 16 wristbands, but only 15 people turn up. There are also cases where there are children under 5. The system will determine the correct distributions when you set the numbers, and press Allocate Guests.
In the example above, if you set 9 guests as Under 5, and 3 guests as No-shows, the result would be:
- 3 No Shows means there are only 2 guests to allocate
- 9 guests Under 5, however the initial 12 guests will always use the Over 5’s first, so the 2 extra guests would be charged as Under 5
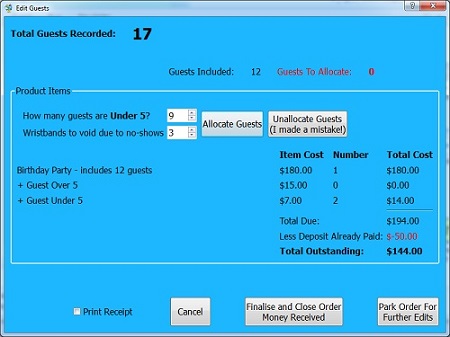
- The customer would owe $144.00.
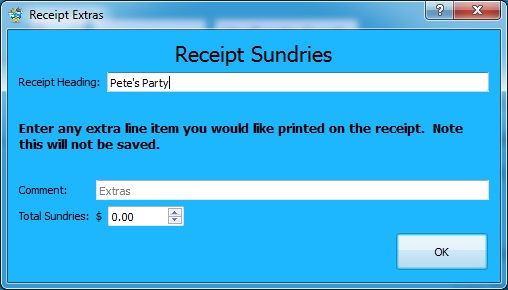
To finalise the order, press Finalise and Close Order Money Received. If you have a normal printer (other than your Wristband Printer) connected, you can also Print Receipt when you finalise, by ticking the box first. This also allows you to note any sundries such as coffee/drinks, etc. This is not a Tax Invoice and does not include GST components and is just for the party organisers use.
Add Guest / Finalise Shortcuts
To save time “clicking” through to access the Manage Pre-Booked Entries screen, there are shortcuts on the Main Screen, to Add Guests (print a wrist band) and Finalise (open the screen for allocating guests). All parties for the day will appear in the Todays Parties section until the party is finalised.

![]() Clicking this button will add a GUEST for the Party and print a wristband (as in the process via Edit Guest List in the Pre-Booked Entries section.
Clicking this button will add a GUEST for the Party and print a wristband (as in the process via Edit Guest List in the Pre-Booked Entries section.
![]() Clicking this button will open the Finalise Party screen.
Clicking this button will open the Finalise Party screen.
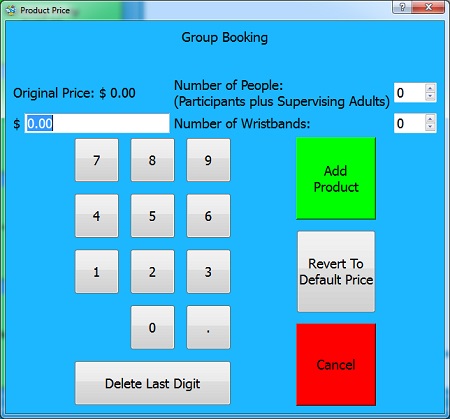
Private Hire / Group Booking
Private Hire of the Inflatables (also known as Group Booking) also needs to go through IWOS. You will also need to get a deposit for this. This would work the same way as the Birthday Parties through IWOS.
The terms and conditions of Private Hire are different to that of Birthday Parties and each stadiums terms and conditions and charges differ so these do not get entered into the online booking system. You would just send them a confirmation email of their booking.
So you have a Private Hire booking and you are going to charge $450 per hour for up to 100 people and they want the booking for 2 hours. You have requested that they pay $100 deposit into your bank account prior.
Click on  (or Private Hire if that’s what your button has printed on it), which will bring up a screen to enter the relevant numbers, as each hire is different. You probably don’t require wrist bands, but do need to know the number of people, hence these being two separate questions.
Sales Reports
There are a couple of reports that you can view, to monitor your stadiums performance. It is possible to change the date you are looking at to drill down into your history.
Daily Sales
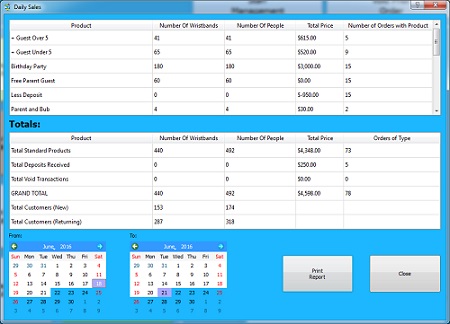
The Daily Sales report is broken down in to two sections.
- The top section shows, for each product type, how many wristbands / people / value / number of orders. In the example above, there were 41 +Guest Over 5 wristbands printed (ie, people above the initial 12 for the party), and they were spread across 5 parties.
- The bottom section shows summary totals.
You can print this report, which will generate a PDF for you to view with any PDF viewer (Acrobat, for example) or print.
Sales History
You can also view graphical representations of the Sales History for a period.
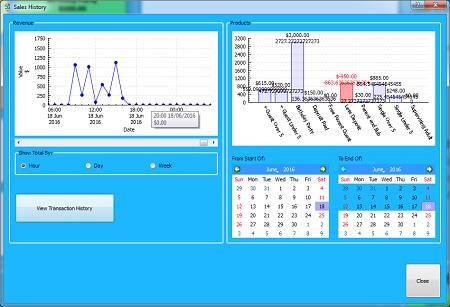
The chart on the left can be broken down hourly, daily or weekly to monitor your stadiums performance over the past.
Transaction History
There are times when you need more details of people through the door. The Transaction History will show you this.

Staff Management
IWOS is not designed to manage the staff at your stadium; however it will provide you with support for staff that are registered through the IWOS Samsung Tablet.
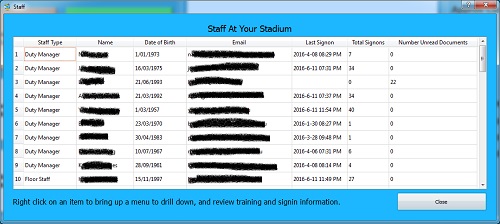
At a glance you can see various bits of information to do with your staff. Any column can be sorted on by clicking its title.
By right clicking on a staff member, you can drill down to see their sign on history, and also their training document history (what date/time they signed off documents as read).


Birthday Booking System

setting printers and passwords